CAADE Docker Solution
This solution is a Docker solution of the CAADE Architecture. It utilizes Docker Swarm, Jenkins, Salt Stack and GlusterFS. It is a simple example of the concepts of the CAADE architecture running on a small scale.
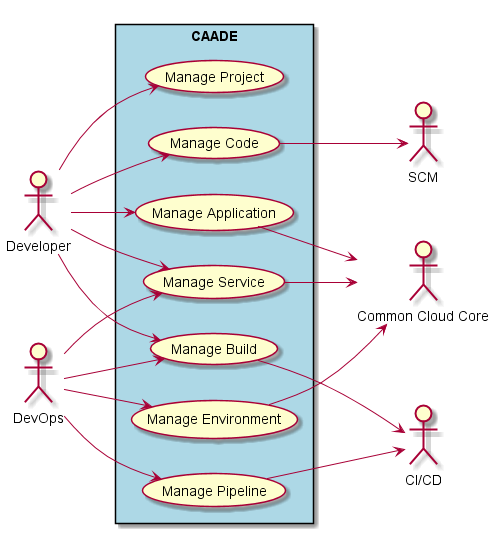
High level Use Cases
- Manage Application
- Manage Build
- Manage Code
- Manage Environment
- Manage Pipeline
- Manage Project
- Manage Service
Logical Architecture
Developer need to focus on the development of applications. When code is modified and checked into a code repository like github. A CICD system will automatically build, test and deploy the application, microservice or project. Multiple environments that have been created in the Common Cloud Core will be used by CAADE and the CICD to promote applications across the different environments.
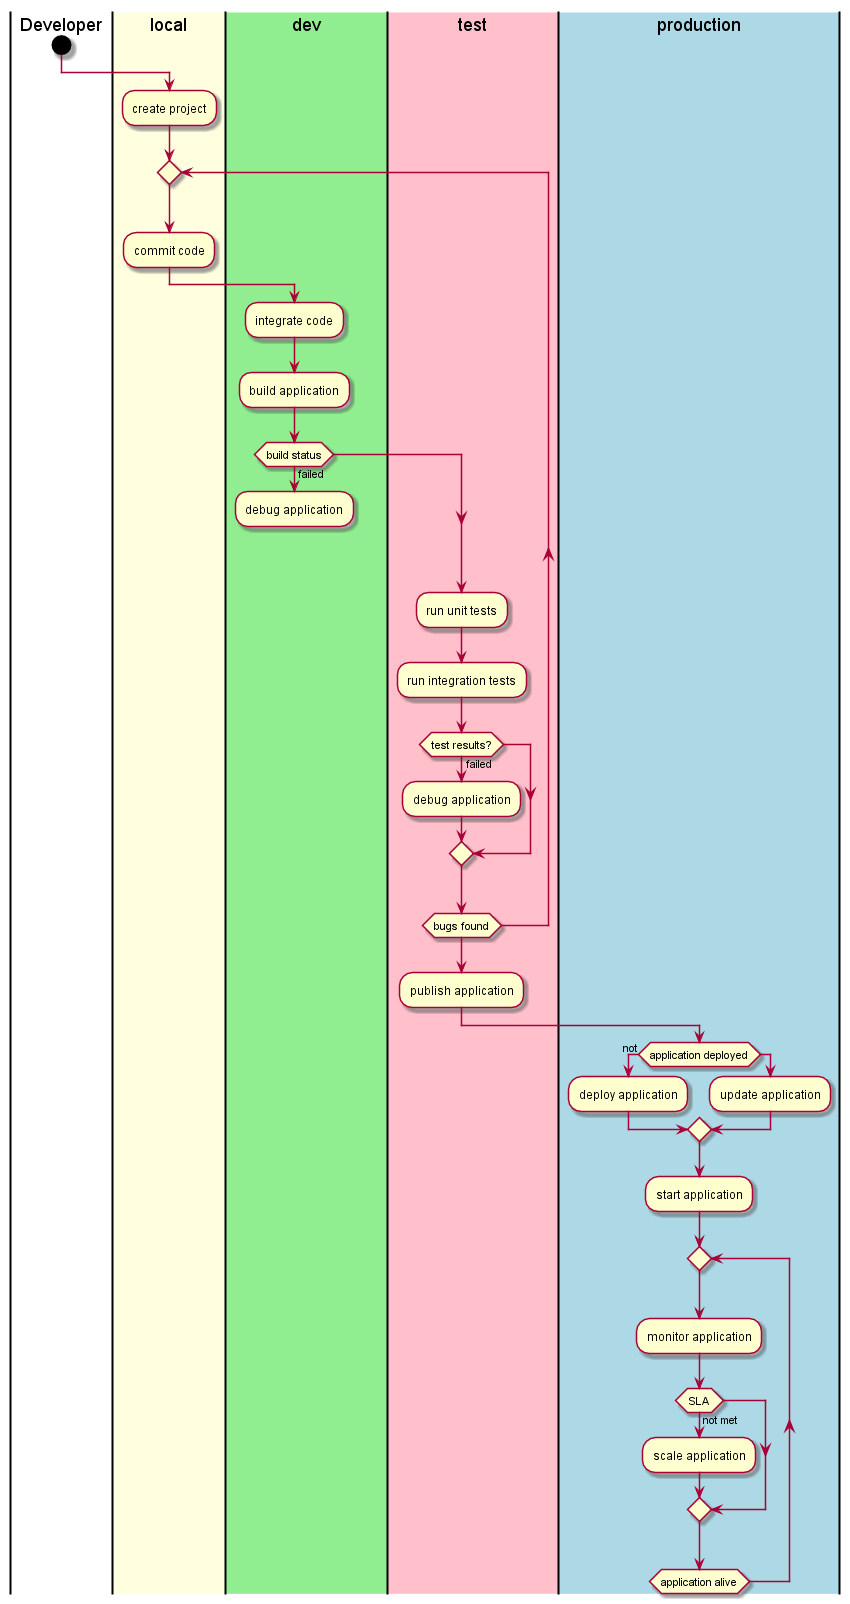
Process Architecture
This diagram shows how a developer interacts with CAADE to develop, test, and deploy cloud aware applications.
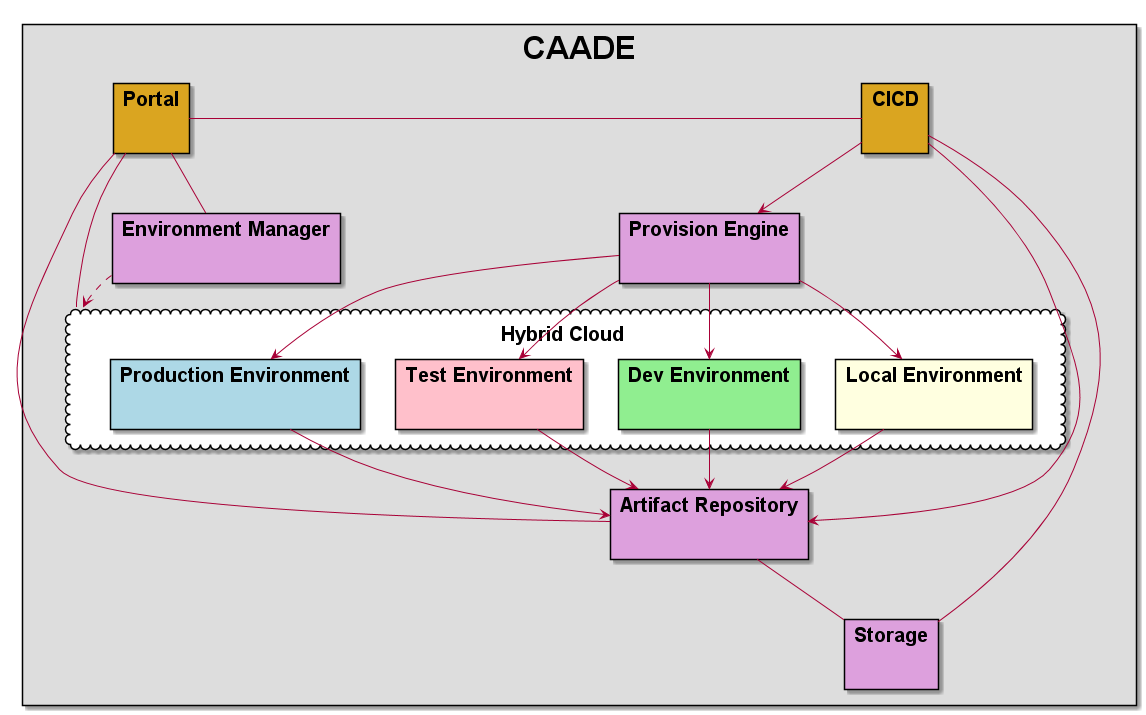
Deployment model
CAADE is made up a of a set of services and micro-services to deliver capabilities to the Developer. The Service architect shown in the deployment model is an example of an implementation of a CAADE architecture.
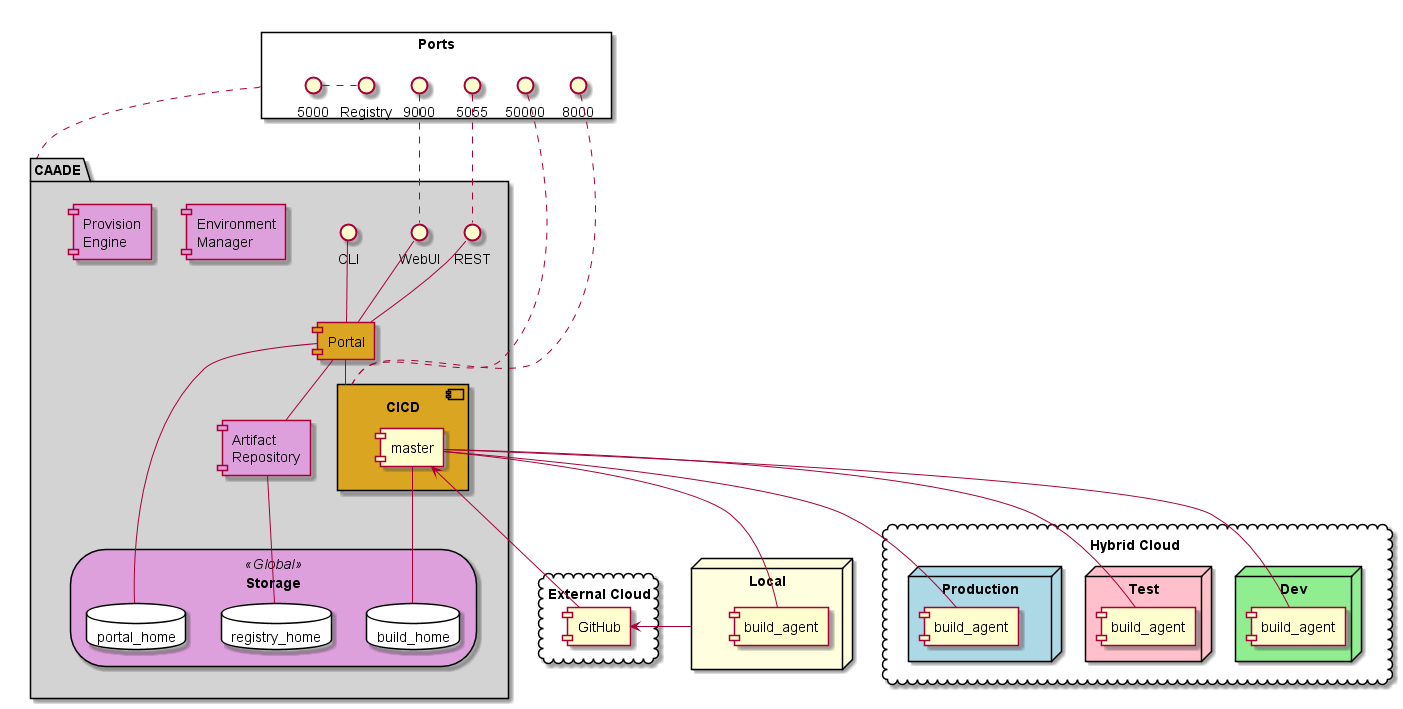
Physical Architecture
The physical architecture of CAADE is an example of a minimal hardware configuration that CAADE can be deployed.

Deployment
This is a Reference Architecture for the CAADE solution using Salt, Docker, Jenkins, and Gluster.
Salt Stack
Install Salt Master on Node 0
node0# sudo apt-get install salt-api
node0# sudo apt-get install salt-master
node0# sudo apt-get install salt-minion
Now that you have salt installed on node0 (master node). Go to the master configuration file /etc/salt/master and add these lines.
file_roots:
   base:
     - /srv/salt/
pillar_roots:
  base:
    - /srv/pillar
There should be several things that are in the /etc/salt/master file commented out.
Get the fingerprint of the master node
node0# sudo salt-key -f master.pub
Save this string it will be used in the configuration of the minions.
Install Salt Minion on Node[0-4]
node1# sudo apt-get install salt-minion
Now edit the /etc/salt/minion file to contain the following
master: node0
master_finger: "Put output of 'alt-key -f master.pub' here"
Get things running
On node0 start the salt master as root in the foreground
node0# sudo salt-master
or in the background
node0# sudo salt-master -d
On node[0-4] start the salt-minions
node1# sudo salt-minion
or in the background with the -d flag
node1# sudo salt-minion -d
now go back to node0 and accept the minions into the salt stack
node0# sudo salt-key -A
Now you can test and see if salt can see all of the nodes
node0# salt "*" test.ping
node0:
    True
node1:
    True
node2:
    True
node3:
    True
node4:
    True
- Configure Salt states
- Configure Salt Pillar
- Download Salt Formula for CAADE
Install Gluster
Install Gluster on each of the nodes (node[0-4])
node0# sudo apt-get update
Install GlusterFS package using the following command
node0# sudo apt-get install -y glusterfs-server
Start the glusterfs-server service on all gluster nodes.
node0# sudo service glusterfs-server start
Create Volumes for Gluster to use This assumes that you already have drives that have been mounted.
sudo mkdir -p /data/gluster
sudo mount /dev/sdb1 /data/gluster
Add an entry to /etc/fstab for keeping the mount persistent across reboot.
echo "/dev/sdb1 /data/gluster ext4 defaults 0 0" | sudo tee --append /etc/fstab
Now attach all of the nodes to each other. Go to node0 and type the following.
node0# sudo gluster peer probe node1
node0# sudo gluster peer probe node2
node0# sudo gluster peer probe node3
node0# sudo gluster peer probe node4
Now you can add volumes to the gluster cluster
node0# salt "*" cmd.run "mkdir -d /data/gluster/gvol0"
node0# sudo gluster volume create gvol0 replica 2 node1:/data/gluster/gvol0 node2:/data/gluster/gvol0
node0# sudo gluster volume start gvol0
node0# sudo gluster volume info gvol0
Mount Gluster Volumes on all of the nodes
Now you have created a volume and now you can access it on all of the nodes by mounting it.
node0# mkdir /mnt/glusterfs
node0# mount -t glusterfs node1:/gvol0 /mnt/glusterfs
To make the mount permanent across reboots you need to add it to the fstab
node0# echo "node1:/gvol0 /mnt/glusterfs glusterfs defaults,_netdev 0 0" | echo tee --append /etc/fstab
Additional information can be found [here](http://www.itzgeek.com/how-tos/linux/ubuntu-how-tos/install-and-configure-glusterfs-on-ubuntu-16-04-debian-8.html)
Docker Swarm
There is a great blog on how to generically set this up [here](http://btmiller.com/2016/11/27/docker-swarm-1.12-cluster-orchestration-with-saltstack.html).
- Using Salt Stack install
- Test Docker Swarm Installation
Jenkins Configuration
Install the following plugins 1. Self-Organizing Swarm Plug-in Modules
Registry Configuration
An RSA key is needed for the local Docker Registry. This can be done with OpenSSL. The docker-compose.yaml file for the deployment of CAADE stores in volumes that are monunted into the containter. The domain.key and domain.cert files should be accessible.
Generating the openssl certs.
So we need to generate the key and cert in a ./registry_certs directory in the same path of where you run the stack deploy command. so you will need to create a directory named registry_certs and then run the openssl command.
# mkdir registry_certs
# openssl req -newkey rsa:4096 -nodes -sha256 -keyout registry_certs/domain.key \
 -x509 -days 356 -out registry_certs/domain.cert
Generating a 4096 bit RSA private key
.......................++
...............................................................................................................................................++
writing new private key to 'registry_certs/domain.key'
-----
You are about to be asked to enter information that will be incorporated
into your certificate request.
What you are about to enter is what is called a Distinguished Name or a DN.
There are quite a few fields but you can leave some blank
For some fields there will be a default value,
If you enter '.', the field will be left blank.
-----
Country Name (2 letter code) [AU]:US
State or Province Name (full name) [Some-State]: CA
Locality Name (eg, city) []:
Organization Name (eg, company) [Internet Widgits Pty Ltd]:
Organizational Unit Name (eg, section) []:
Common Name (e.g. server FQDN or YOUR name) []: <registry server>
Email Address []:
Now that the keys are created and put into a directory that the docker compose file references and put into the secrets docker will now know where to find the keys and certs to launch a secure private repository. Make sure that you access the registry through the same name specified in the key generation <registry server>. Ideally this would be a common name that all clients can access through exposure of the ports through the docker stack deploy. Such as the docker swarm node machine.
Putting the certs in each Client
Using the CAADE configuration we put the domain.cert in the /etc/docker/certs.d directory. Specifically we need to put the domain.cert into the /etc/docker/certs.d/<registry_address>/ca.cert. In order to do this simply we need to put the domain.cert in a mounted filesystem and using salt to update docker client. This will make it so every node in the docker swarm can access the local private repository.
cp -r ./registry-certs /mnt/registry/registry-certs
salt "*" cmd.run "mkdir -p /etc/docker/certs.d/node0:5000"
salt "*" cmd.run "cp /mnt/registry/registry-certs/domain.cert /etc/docker/certs.d/node0:5000/ca.crt"
salt "*" cmd.run "service docker restart"
Deploying the stack of services
Now that the environment is set up. You can now deploy the stack to your cluster of machines. You will need to:
- Get the latest release from github.
- Copy the registry_certs to the deploy directory. For the local private Registry.
- Deploy the stack to docker.
# git clone http://github.com/CAADE/CAADE
# cd deploy
# cp -r <registry_certs> ./registry_certs
# docker stack deploy --compose-file production/docker-compose.yaml caade